What is Redis?
Redis is a NO-SQL in-memory remote database that offers high performance, replication, and a unique data model. It is an in-memory data structure that could be used as a fast database, cache, and message broker. Redis supports several types of data structures such as strings, hashes, lists, sets, bitmaps, geospatial indexes, and streams.
How to Install Redis on Windows?
Below are the steps to properly install Redis on Windows.
Step 1: Download. Zip Or. Msi File
Redis is not available on Windows but Microsoft makes it available for Windows users. Go to https://github.com/microsoftarchive/redis/releases to Download a .zip or .msi file. The ZIP file will require you to add the environment variables manually while the MSI file is an installer and will do it automatically for you.
Step 2: Extract The ZIP File
Create a new folder named “Redis” and extract the ZIP file into it. Name the folder as you like but it is good to follow the conventions. By default, the Redis folder will be downloaded on the Download folder of the Windows. Then we create a folder and extract the ZIP file into it.
We may accidentally delete the Redis folder and the system will not find the path to open the Redis-server and Redis-CLI. So, it will be a good choice if we move our Redis folder to the root of the C Drive.
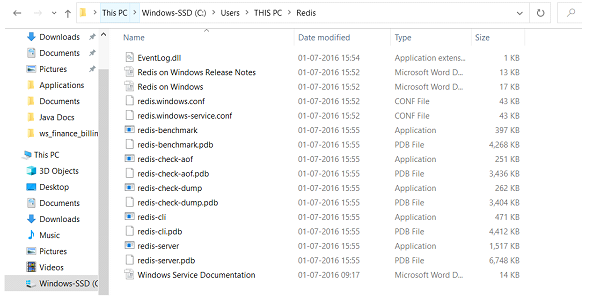
After extracting the ZIP, you will see files of the Redis. Two important files in this folder are redis-server.exe which will run the redis server and the redis-cli.exe which will enable us to interact with the server.
Let’s start the redis-server by double-clicking the redis-server.exe. By Default Redis Server runs on port 6379.
Step 3: Create a sample Spring Boot Application
Add dependencies in pom.xml:
<?xml version=”1.0″ encoding=”UTF-8″?>
<project xmlns=”http://maven.apache.org/POM/4.0.0″
xmlns:xsi=”http://www.w3.org/2001/XMLSchema-instance”
xsi:schemaLocation=”http://maven.apache.org/POM/4.0.0 https://maven.apache.org/xsd/maven-4.0.0.xsd”>
<modelVersion>4.0.0</modelVersion>
<parent>
<groupId>org.springframework.boot</groupId>
<artifactId>spring-boot-starter-parent</artifactId>
<version>2.6.3</version>
<relativePath /> <!– lookup parent from repository –>
</parent>
<groupId>com.mss</groupId>
<artifactId>rediscachewithspringboot</artifactId>
<version>0.0.1-SNAPSHOT</version>
<name>rediscachewithspringboot</name>
<description>Demo project for redis cache with springboot</description>
<properties>
<java.version>11</java.version>
</properties>
<dependencies>
<dependency>
<groupId>org.springframework.boot</groupId>
<artifactId>spring-boot-starter-data-redis</artifactId>
</dependency>
<dependency>
<groupId>org.springframework.boot</groupId>
<artifactId>spring-boot-starter-web</artifactId>
</dependency>
<dependency>
<groupId>redis.clients</groupId>
<artifactId>jedis</artifactId>
</dependency>
<dependency>
<groupId>org.projectlombok</groupId>
<artifactId>lombok</artifactId>
<optional>true</optional>
</dependency>
<dependency>
<groupId>org.springframework.boot</groupId>
<artifactId>spring-boot-starter-test</artifactId>
<scope>test</scope>
</dependency>
</dependencies>
<build>
<plugins>
<plugin>
<groupId>org.springframework.boot</groupId>
<artifactId>spring-boot-maven-plugin</artifactId>
</plugin>
</plugins>
</build>
</project>
Step 4: Create starter class
package com.mss;
import org.springframework.boot.SpringApplication;
import org.springframework.boot.autoconfigure.SpringBootApplication;
@SpringBootApplication
public class RediscachewithspringbootApplication {
public static void main(String[] args) {
SpringApplication.run(RediscachewithspringbootApplication.class, args);
}
}
Step 5: Create an entity class
@RedisHash:
When a class is annotated with @RedisHash, the entity can be saved on Redis using the .save method.
package com.mss.entity;
import lombok.AllArgsConstructor;
import lombok.Data;
import lombok.NoArgsConstructor;
import org.springframework.data.annotation.Id;
import org.springframework.data.redis.core.RedisHash;
import java.io.Serializable;
@Data
@AllArgsConstructor
@NoArgsConstructor
@RedisHash(“Product”)
public class Product implements Serializable {
/**
*
*/
private static final long serialVersionUID = 1L;
@Id
private int id;
private String name;
private int qty;
private long price;
}
Step 6: Create a repository class
package com.mss.repositoty;
import org.springframework.beans.factory.annotation.Autowired;
import org.springframework.data.redis.core.RedisTemplate;
import org.springframework.stereotype.Repository;
import com.mss.entity.Product;
import java.util.List;
@Repository
public class ProductDao {
public static final String HASH_KEY = “Product”;
@Autowired
private RedisTemplate template;
public Product save(Product product){
template.opsForHash().put(HASH_KEY,product.getId(),product);
return product;
}
public List<Product> findAll(){
return template.opsForHash().values(HASH_KEY);
}
public Product findProductById(int id){
System.out.println(“called findProductById() from DB”);
return (Product) template.opsForHash().get(HASH_KEY,id);
}
public String deleteProduct(int id){
template.opsForHash().delete(HASH_KEY,id);
return “product removed !!”;
}
}
Step 7: Create a controller class
@Cacheable annotation:
This annotation is used to mark the method return values that will be stored in the cache. The @Cacheable annotation can be applied either at the method or type level. When applied at the method level, then the annotated method’s return value is cached.
@EnableCaching annotation: To enable the cache
package com.mss.controller;
import java.util.List;
import org.springframework.beans.factory.annotation.Autowired;
import org.springframework.cache.annotation.CacheEvict;
import org.springframework.cache.annotation.Cacheable;
import org.springframework.cache.annotation.EnableCaching;
import org.springframework.web.bind.annotation.DeleteMapping;
import org.springframework.web.bind.annotation.GetMapping;
import org.springframework.web.bind.annotation.PathVariable;
import org.springframework.web.bind.annotation.PostMapping;
import org.springframework.web.bind.annotation.RequestBody;
import org.springframework.web.bind.annotation.RequestMapping;
import org.springframework.web.bind.annotation.RestController;
import com.mss.entity.Product;
import com.mss.repositoty.ProductDao;
@EnableCaching
@RestController
//@RequestMapping(“/product”)
public class UserController {
@Autowired
private ProductDao dao;
@PostMapping(“/createproduct”)
public Product save(@RequestBody Product product) {
return dao.save(product);
}
@GetMapping(“/fetchallproducts”)
public List<Product> getAllProducts() {
return dao.findAll();
}
@GetMapping(“/getproductbyid/{id}”)
@Cacheable(key = “#id”, value = “Product”)
public Product findProduct(@PathVariable int id) {
return dao.findProductById(id);
}
@DeleteMapping(“/deleteproductbyid/{id}”)
@CacheEvict(key = “#id”, value = “Product”)
public String remove(@PathVariable int id) {
return dao.deleteProduct(id);
}
}
Step 8: Create a Redis Config class
⦁ JedisConnectionFactory establishes the connection.
⦁ Once the connection is established, we can access the Redis server from our application by using RedisTemplate.
package com.mss.config;
import org.springframework.context.annotation.Bean;
import org.springframework.context.annotation.Configuration;
import org.springframework.data.redis.connection.RedisStandaloneConfiguration;
import org.springframework.data.redis.connection.jedis.JedisConnectionFactory;
import org.springframework.data.redis.core.RedisTemplate;
import org.springframework.data.redis.repository.configuration.EnableRedisRepositories;
import org.springframework.data.redis.serializer.JdkSerializationRedisSerializer;
import org.springframework.data.redis.serializer.StringRedisSerializer;
@Configuration
@EnableRedisRepositories
public class RedisConfig {
@Bean
public JedisConnectionFactory connectionFactory() {
RedisStandaloneConfiguration configuration = new RedisStandaloneConfiguration();
configuration.setHostName(“localhost”);
configuration.setPort(6379);
return new JedisConnectionFactory(configuration);
}
@Bean
public RedisTemplate<String, Object> template() {
RedisTemplate<String, Object> template = new RedisTemplate<>();
template.setConnectionFactory(connectionFactory());
template.setKeySerializer(new StringRedisSerializer());
template.setHashKeySerializer(new StringRedisSerializer());
template.setHashKeySerializer(new JdkSerializationRedisSerializer());
template.setValueSerializer(new JdkSerializationRedisSerializer());
template.setEnableTransactionSupport(true);
template.afterPropertiesSet();
return template;
}
}
Step 9: Run the Application
Step 10: Save the product’s data
Endpoint:
Input:
{
“id”: 1,
“name”: “LAPTOP”,
“qty”: 1,
“price”: 30000
}
Response:
{
“id”: 2,
“name”: “LAPTOP”,
“qty”: 1,
“price”: 1000
}
Input2:
{
“id”: 2,
“name”: “MOBILE”,
“qty”: 1,
“price”: 15000
}
Response2:
{
“id”: 2,
“name”: “MOBILE”,
“qty”: 1,
“price”: 15000
}
Step 11. Fetch all the product list
Request: http://localhost:8081/fetchallproducts
Response:
[
{
“id”: 1,
“name”: “MOBILE”,
“qty”: 1,
“price”: 100
},
{
“id”: 2,
“name”: “LAPTOP”,
“qty”: 1,
“price”: 1000
}
]
Step 12: Fetch the product details from ID:
Endpoint: http://localhost:8080/getproductbyid/1
In the first time, it will get the data from the table. If you trigger the endpoint, again and again, the data will be coming from the cache.
Logs:
Here the log is printing only ones, which means db calls won’t occur. Data comes from the cache.


